
Okay, so you've opened up Illustrator (maybe for the 100th time) hoping that this is the time that it all makes sense. I know, it's definitely different than Photoshop but once you know it's nuances, you'll be glad you figured it out.
In this lesson (if you want to call it that), we'll take a look at the Pen Tool, some selection tools, and stroke/fill options. When you're done, you should have a better idea about what you can make with Illustrator and why it's a great tool to make artwork with.
Did you get here from my Patreon campaign? Well, in future posts there will be downloadable supporting material like example files and video run-throughs made available to my patrons. If you like posts like these, you can support me by contributing here. Okay, let's begin.
The Workspace
Like most art applications, Illustrator has a tool palette, an art board, and some panels like Layers, Swatches, Stroke, etc. Your tool palette might look a little different than mine, but that's okay because we're only going to focus on a couple of things. To follow along, the only things that you'll need open are the Tool Palette, the Stroke Panel (Window>Stroke) and maybe the Layers panel (Window>Layers).
Typical Illustrator Workspace
The Pen Tool

Sketch from Sketchbook Pro and traced vector line work in Adobe Illustrator
Illustrator has gained a lot of new features in the last twenty years or so, but really its killer feature might always be the Pen Tool. There's nothing in the real world that works like it. Traditionally technical drawing involves precision ink pens, french curves, templates and bendy rulers. The digital equivalent in graphics applications changed all of that. It's so important that a lot of Illustrator's toolset revolves on supporting this tool or enhancing what it makes. For now, I'm just going to try to show you how to simply draw some lines with the thing.
Some people try out the Pencil Tool first, which allows you to draw on the artboard in a freeform fashion, as you might with a pencil on paper or a digital brush in Photoshop. But sketching in Illustrator isn't really all that great. Sometimes making a drawing in Illustrator feels more like sculpture, because you sort of "build" the drawing point by point. It can seem technical, but with practice it feels like second nature. Okay, take a deep breath. I'm about to blow your mind with the Pen Tool.
The Pen Tool looks like a quill tip in the tool palette. If you click on it and hold down the mouse button for a second, you'll get a fly-out menu with some options. We'll get to those options later, but it's good to know where they are.
Behold, the Pen Tool
The Pen Tool Fly-out menu

Drawing Straight Paths
Like I mentioned, there's nothing quite like the Pen Tool. It's kind of like playing connect the dots but with rubber bands. With the tool selected, when you click on the artboard, a point is created. If you click again, a line will appear connecting the two points. It will continue that way until you Deselect the artwork or choose another tool.

Drawing Curved Paths
This is where the rubber bands metaphor comes in. If, instead of a series of straight lines, you want curved lines, you can do that by holding down the cursor on the second click. So, you might click once to create a point. Then, on making the second point, hold and drag to create a curve. Blue handles will grow out from your curve. Those handles allow you to adjust that curve later. These curves are called Bézier curves, named for the mathematical principal from which they are created. Most people new to Illustrator just call them confusing, but they are a seriously powerful way to draw clean lines.

Straight and Curved Paths
It would be pretty weird if you only just curved lines or just straight lines. Usually, you're going to be drawing some sort of mix. Illustrator lets you switch from an angle to a curve fairly easily (even if it's not intuitive). You might find that your line shoots off on a weird angle or curve when going from a curved segment to a straight segment. This is the biggest complaint that I've heard from people learning to use the Pen Tool. Why does the line react in this unexpected way? Math.
When you intend to go from a bent path into a straight line (maybe you're drawing the letter D, for example) Illustrator doesn't know that you want to end the curve and start making a straight line, so it assumes you want a nice continuous curve. Paths are drawn with mathematical equations in Illustrator, so a crazy flyaway line might be the result of that math. We need to tell Illustrator that we're done doing math for that curve, and that it's time to make a straight line now. The simple way to start a straight line after a curve is to click that last point in your curve. This is like hitting the Clear button on your calculator. It's saying, "Good work, Illustrator. It's time to make a new segment now." So, if you click that last point in your curve and then click another other space on the artboard, a new straight line will be formed. If you intend to make a new curve, that curve will not effect the previous curve. Practice this back-clicking a few times and it will start to make sense.
Using Paths to Make Shapes
So far, I've been using the terms "paths", "lines", and "curves" pretty interchangeably. They all describe segments of a linear drawing. If you want to make those parts into a solid shape like a star, a rectangle, or a weird amoeba, you need to "close" the shape. This just means connecting the dots all the way back to the first dot. From the last point on your path, if you hover over the first point, an "O" symbol will appear next to your cursor. This indicates that you are closing a path and creating a solid shape. With a continuous shape, you can manipulate all of it's attributes at the same time more easily. We'll talk more about Shapes in future lessons.
Selecting, De-Selecting and Adjusting
There are a couple of ways to select and deselect things in Illustrator. If you use the arrow tools in the tool palette, you can select parts of a drawing. To select everything, I use the shortcut Cmd+A. To deselect everything, I use the shortcut Cmd+Shift+A. To deselect the thing you are working on, with a Selection Tool (either of the arrows) you can just click off of the path or object onto a blank area of the artboard.

Remember when I said that those blue handles that grow out from the curves can be adjusted? Well, they can, and that's part of what makes drawing in Illustrator (and other vector graphics applications) so cool. You can go back and change things, sculpting into something better or different.
To refine your paths, you'll be using the Selection tools. There's a "black arrow" tool that might be similar to other programs you've worked in. It's called the Selection Tool and with it, you can move around whole shapes and line constructions. If you want to adjust individual parts of a line, like a curve, you'll want to use the Direct Selection tool or the "white arrow". With the Direct Selection tool selected, you can click on points and handles of curves. De-select those points to move on to other adjustments. In addition to dragging selected points around, you can move them with the arrow keys on your keyboard. Holding the Shift key while pressing the arrow keys will move the point(s) by a factor of 10.

Adjusting Stroke and Fill
Any line or object made in Illustrator has a Fill and a Stroke value. The Fill is the color (or lack of color) that exists between two or more points. The Stroke is the color and thickness along the length between two or more points. At the bottom of the Tool Palette, Illustrator has a Fill/Stroke indicator. It looks similar to the Foreground/Background color indicator in Photoshop but it's actually very different. In Illustrator the two boxes represent the Fill and Stroke colors of an object. By default, this is usually set to black and white. An empty fill or stroke is represented by the red "/". The fill and stroke values can be swapped by clicking the double-headed bent arrow next to the boxes. For our purposes in learning to make strokes with the Pen Tool, we will probably stick to an empty fill color and a black stroke color. With an item selected, you can change the stroke and fill in the indicator and your object will change. Don't worry, nothing is permanent in Illustrator. You can change it back with no problem.
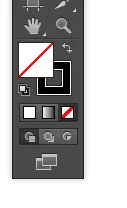


Changing/Swapping Fills and Strokes with the Fill/Stroke indicator
The Stroke Panel
In the same way that you can change the point size of fonts, you can change the point size of lines in Illustrator. The Stroke Panel is found at Window>Stroke if it's not already open by default. While your line is selected, you can change the weight of the stroke and a number of other options. For the time being, we're just going to look at the Weight attribute. The width grows outward from the center of the line, so it will get fatter symmetrically as you increase the thickness. This is handy to know when putting a thick stroke on letters, as it will start to intrude on the interior space.
The Appearance Panel
The Appearance Panel allows you to adjust the attributes of an object, including the stroke weight and color. You can find it by going to Window>Appearance. You'll notice that you can change the point size of a stroke right in the Stroke attribute. In addition, you can swap the layering of the Stroke and Fill attributes by dragging them above and below each other. This means that you can drag the Fill on top of the Stroke. By default, the Stroke is always on top. That's why the strokes thickness normally intrudes on the inside of the shape. But, if you put the Fill on top, the stroke will expand from behind the shape.
If you want to get really crazy, you can even assign multiple strokes and fills to a shape. You'll find that option by clicking the paper icon next to the trash icon at the bottom of the panel. It's fun to play with layering multiple stroke and fill attributes but it's beyond the scope of this lesson. We're going to keep things simple, even as we move on to actually making a real drawing!

Next Time...
In Learn To Love The Pen Tool Part 2, we'll actually start making a drawing based on the things covered in this post. I'll show you how to bring in a sketch or photograph and start tracing it using the Pen Tool. In the end, you'll have something that looks like a coloring book page.
If you like this sort of instructional post and want to see more, please consider contributing to my Patreon campaign. I have plans for contributors to get special perks like example files, videos, custom brushes, and other add-ons for Illustrator.