
Lots of people find Illustrator’s drawing tools challenging and just plain weird. I think this is because drawing with Illustrator and other vector-based software is just really different on a basic level.
So, to help wrap your head around those basic differences, it’s probably best to just start with one simple tool and see what you can make with it.
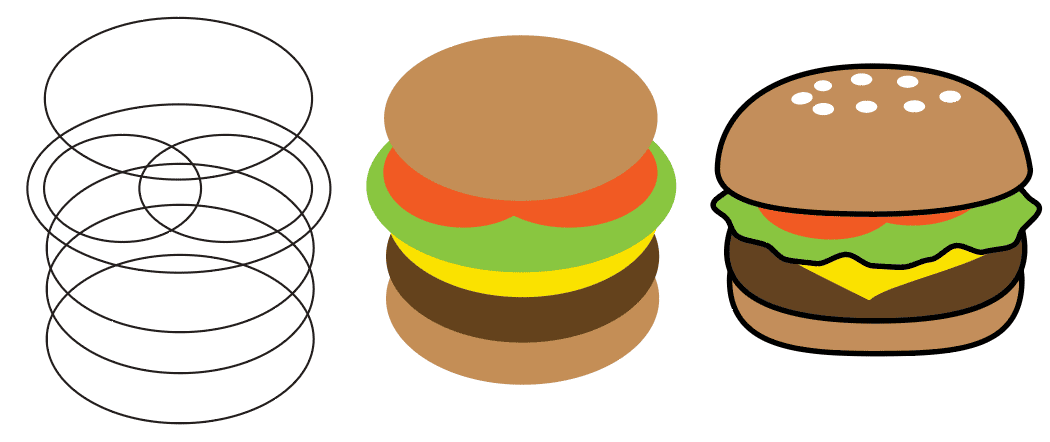
For this lesson, I'll show you how to make a hamburger graphic using the Ellipse Tool. It's a good excuse to cover the fundamentals of Illustrator. Even if you’re already comfortable with Illustrator, maybe you’ll pick up some helpful tips that you didn't already know.
The Ellipse Tool
To begin, you’ll need to find the Ellipse Tool. Depending on how Illustrator is set up on your computer, it might be hidden under the Rectangular Polygon Tool or nested underneath the Text Tool in your Tools Panel. On my computer, it's under the Text Tool. We're going to make the different layers of the hamburger graphic with ovals drawn using the Ellipse tool. So, drag an oval onto the screen.
If you hold "Option", you'll see that the oval "grows" out from the center point. We'll be using Option to modify other tools in the exercise.
The Color Picker and Color Panel
Now that you've got an oval, let's take a look at how to give it a color. The color boxes in the Tools Panel look similar to Adobe Photoshop but they are actually completely different. In Photoshop, they indicate Foreground/Background colors but in Illustrator they indicate Fill and Stroke colors. If you double-click either box, the Color Picker window will appear and any color can be chosen.
Sometimes the "Only Web Colors" box is checked. If you uncheck that box, you'll have access to more colors.
If you want to fine-tune your colors choice, you can open the Color panel and adjust the sliders. The sliders will be (R)ed, (G)reen, and (B)lue if your document's color mode is RGB or (C)yan, (M)agenta, (Y)ellow, and blac(K) if your document is in CMYK color mode. Even if your document is RGB, you can still access the CMYK sliders by clicking the options icon in the Color Panel.
Now that you know how to pick a color, make the oval a color that works well for a hamburger bun.
Moving, Duplicating, and Arranging
To make the rest of the shapes, you could draw more ovals with the Ellipse tool, but since you already made one, it's easier to just duplicate the bun oval many times for each layer of the burger. If you hold option while dragging an object, it will automatically create a copy of that object. Since every new object appears on top of the previously created object, drag upward to create the meat oval.
Change its color and continue upward until you have as many ingredients as you like. I resized my tomato ovals so that they are more tomato-like. Save the top bun for the next step.
You already have a bottom bun that would be perfect for the use as a top bun. It's at the bottom of your stack so to duplicate it quickly on top of the other ovals, select it, copy it (Cmnd+C), and past it using Edit>Paste In Place from top menu. Shift+Cmnd+V also works.
Paste In Place pastes a copied object exactly where it was copied from. This is handy for maintaining alignment. The pasted bun oval should be on top of the stack now. Drag it or use the arrow keys (or Shift+arrows for extra speed) to move the bun into position.

Some people prefer the lettuce to be on the bottom of the burger to catch the meat grease and spare the bottom bun from becoming a savory, wet, sponge. This was a huge controversy in 2016 during the great "Burger Emoji Wars".
If you prefer that the lettuce be beneath the meat, move the green oval down to where it should be and then send it behind the meat oval by going to the top menu and choosing Object>Arrange>Send Backwards or press Cmnd+] until it's in the correct position. Personally, I'm a lettuce-on-top kind of guy but I don't judge.
Layers
So far, you've probably made every object on one layer. Objects stack on top of each other with each layer in Illustrator and they remain moveable and manipulatable independent of the other objects.
So you could totally make a one-layer burger if you wanted to. However, sometimes layers are nice for keeping things organized. Here's how you can move objects from one layer to another.
When an object is selected, a little dot appears in the Layer Panel. This makes it easy to see which layer that object is on if you have a lot of layers. To move the object to another layer, simply make a new layer and drag the dot to that layer.
Practice this by creating new layers for each section of your hamburger graphic. You can double-click the layer name to rename the layers.
Isolating Handles with "Option"
Now that you have all of your burger-parts, it's time to manipulate the ovals to make them look more like their ingredients.
To put a corner on the cheese, select the Direct Selection Tool (the "White Arrow") in the Tools panel and click on the bottom point of the yellow oval. That should reveal the path's anchor point handles.
On a curve like this, moving one handle effects the other handle, and that can be frustrating. To isolate the handles, hold down Option while dragging the handle. Pull each handle inward to create an angle for the cheese shape.
Making Lettuce with Appearance Effects
To make the lettuce more leafy-looking, you can add a "Roughen" Effect. Select the green oval. Then, from the top menu, go to Effects>Distort & Transform>Roughen. Check the "Preview" box and adjust the sliders until your green oval looks more like a chunk of lettuce. Click "Ok".
Notice that the selection is still oval-shaped. That's because Illustrator is projecting the Roughen appearance on top of the basic oval shape. That allows you to change the appearance more later.
To make changes to an appearance, select the object (in this case, the lettuce) and open the Appearance panel from the top menu (Window>Appearance). In the Appearance panel, click the "fx" icon to jump back into the Roughen options.
f you want to manually adjust the curves of the leafy lettuce, you'll need to "expand" the appearance. To do that, from the top menu go to Object>Expand Appearance. That will then create lots of points around the shape of the object.
Final Details
Then, it's just a matter of using the selection tools to reshape the objects to look more like the ingredients and moving them into position. I added some small oval sesame seeds to the top bun on my hamburger. I also decided to give some objects a black outline. That's really all there is to it for this exercise. If we were to keep going, I'd explain how to add gradients, drop shadows, and other effects to add dimension to the graphic but I'll save that for another demo.
Want to see more of these? Consider a donation.
Was this helpful? Would you like to see more tutorials like this? If so, please consider a donation to the “More Tutorials Please Fund”.
I totally get it if you can’t swing a donation right now. Maybe you’re a student or maybe spending money on art tutorials just isn’t a priority. But, if you’ve got extra cash kicking around to support art making and art teaching, I’d be grateful for your support. OR, you could save those dollars for hamburgers! If I were you, I might go for the burger, honestly.
…or don’t! It’s okay!